How To Fit Green&Blue SwiftBlock Integrated
How to fit the Green&Blue SwiftBlock Integrated
Thank you for buying a Green&Blue SwiftBlock Integrated from us, it means so much to us to know that you're working together with us to provision for our native wildlife in your own home and that the SwiftBlock Integrated you've bought will house Swifts for many generations to come, the Green&Blue SwiftBlock Integrated has been designed to last for some 50+ years so that you can be rewarded with seeing successful broods over many years.
And so we thought it would be helpful to put together some information for you to help with making sure that your SwiftBlock Integrated is sited and mounted securely and effectively.
In this guide:
- Choosing a position for your SwiftBlock Integrated
- How to fit
- Retrofit Instructions
- New Build Instructions
- Maintenance and cleaning

1. Choosing a position for your SwiftBlock Integrated
Swifts nest very high up so the SwiftBlock Integrated needs to be placed at least 5m from ground level.
The SwiftBlock Integrated should be situated on a side of the building that gets shade during the day or under an overhang or the eaves. Not over windows or near to vents, and away from predator access. Make sure it is situated in a spot with clear adjacent airspace to allow high-speed direct flight access.
Positioning more than one SwiftBlock Integrated
Swifts are happy to nest near one another, meaning that installing multiple boxes to encourage a colony is preferable. The Swift Conservation suggests a minimum of 2 blocks per house, more for a commercial development.
2. How to fit
Designed to fit flush in a newly-built wall or retrofit flush into a wall. Due to the height required for placement, please consult a professional contractor.
2.1 Retrofit Instructions
Step 1. Identify a good spot to install your SwiftBlock Integrated. Follow the instructions for positioning in part 1 of this guide.
Step 2. Identify the brick that you're going to remove. Drill through the existing brick in several places to weaken the surface. You then need to chip out the remaining brick using a chisel, removing all the rubble and ensuring that if you're working on a wall with a cavity behind that none escapes into this space.
Step 3. Prepare the mortar according to the instructions and make a bed joint with the mortar for the SwiftBlock Integrated to sit on.
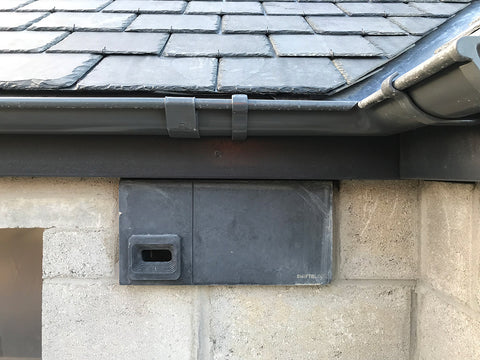
Step 4. Insert SwiftBlock Integrated into the cavity and cement into place making sure that the TOP labelled sits in the correct position with the entrance hole to the bottom of the block. The fascia has been designed to sit flush with the wall so pointing the mortar around it should be a fairly simple task.
2.2 New build Instructions
The SwiftBlock Integrated has been designed to fit with a standard building block size for ease of installation. You will find that the depth of the block allows for an overhang at the front to allow the front to be rendered flush, and for the rear to sit within the wall cavity.
In coursework, lay the Swift Block Integrated as you would a building block, level on the mortar.
The block is marked with the top edge. The bird nesting bowl on the inside is on the bottom. Position the block with the TOP marked on the top edge, level with a spirit level and lay the next course as normal above it.
If cladding, be sure to put the right size the the entrance hole in your cladding. Consult with your construction professional to get the desired result with your chosen construction method.
 |
 |
 |
3. Maintenance and cleaning
The SwiftBlock Integrated should not require any ongoing maintenance.
4. Enjoy your SwiftBlock Integrated and the nature it attracts!
Keeping in touch with us
We would love to know the progress that you have with your SwiftBlock Integrated! Please share your nature photos and videos either on social media or by email to info@greenandblue.co.uk